Have you ever wondered how to grow asparagus in your garden? Asparagus, a perennial favorite, offers a unique blend of flavor and nutrition.
In this blog post, we’ll guide you step by step through the process of planting asparagus.
From choosing the right soil to harvesting your first spears, we’ve got you covered.
Keep reading to unlock the secrets of successful asparagus gardening and enjoy the satisfaction of growing your own delicious, home-grown vegetables!
[ez-toc]
Chapter 1: Planting Basic Of Asparagus
How Long Does it Take for Asparagus to Grow?
The time it takes for asparagus to grow and become ready for harvest depends on how it is planted and the method used. Here are two common methods for growing asparagus and their respective timelines:
1. Growing from Crowns:
- When you plant asparagus crowns (the root systems of mature asparagus plants), it typically takes approximately 2 to 3 years from planting to the first significant harvest.
- In the first year after planting crowns, the asparagus plants focus on establishing strong root systems and building up energy reserves.
- In the second and third years, you can start harvesting a limited number of asparagus spears. However, it’s important not to overharvest during this initial period to allow the plants to grow strong.
2. Growing from Seeds:
- Growing asparagus from seeds is a longer process. It can take 3 to 4 years or more from sowing seeds to the first significant harvest.
- Seeds need to be started indoors, and seedlings require time to grow and develop before they can be transplanted into the garden.
- Similar to crowns, asparagus plants grown from seeds need time to establish their root systems and build up energy reserves before producing a substantial harvest.
Remember, asparagus is a type of veggie that grows back year after year. With good care, it keeps giving us tasty spears for more than a decade! Sure, it might take a bit more time for the first big harvest compared to other plants. But the payoff of always having fresh asparagus from your garden is worth every moment for most green thumbs!
How Much Room Does Asparagus Need to Grow?
Asparagus plants require a reasonable amount of space to grow and thrive. Proper spacing is essential to ensure healthy plant development and good yields. Here are some guidelines for the spacing requirements of asparagus:
1. Between Plants:
- When planting asparagus crowns, space them approximately 18 to 24 inches (45 to 60 centimeters) apart within rows.
- This spacing allows each asparagus crown to develop a strong root system and produce multiple spears without overcrowding.
2. Between Rows:
- Leave about 3 to 4 feet (90 to 120 centimeters) of space between rows of asparagus.
- Adequate spacing between rows provides room for air circulation, which helps prevent diseases and ensures healthier plants.
3. Depth of Planting:
- Plant asparagus crowns or seedlings at a depth of approximately 6 to 8 inches (15 to 20 centimeters) in well-prepared soil.
- Deeper planting can be beneficial in colder climates to protect against winter frosts.
4. Raised Beds:
- Some gardeners choose to grow asparagus in raised beds to improve drainage and create a well-defined growing area.
- In raised beds, maintain the recommended spacing between plants and rows to allow for proper growth.
5. Width of the Bed:
- If you’re planting multiple rows of asparagus, space the rows at least 3 to 4 feet apart.
- This wider spacing facilitates maintenance and provides room for access between rows.
Allowing enough room for asparagus plants helps them grow strong and healthy crowns, leading to a generous harvest. Cramped plants compete for nutrients, which can lower yields. Moreover, adequate air movement keeps diseases at bay and promotes healthier plants. By observing these spacing rules, you’re sure to grow successful asparagus in your garden.
Chapter 2: Space For Asparagus
How Much Space Does an Asparagus Plant Need?
Spacing is equally critical when it comes to growing asparagus. When it comes to understanding spacing for asparagus, it’s essential to consider the growth habit and size of the plants. Asparagus varieties can be categorized into two main types:
1. Crowns of Male Hybrids:
- These tend to be more compact and bushy.
- Plan for about 12 to 18 inches of space between each asparagus crown.
2. Female Plants:
- Female asparagus plants can grow taller and produce more foliage.
- Allow about 18 to 24 inches of space between each female asparagus plant.
Following these guidelines for space can lead to perfect conditions for your asparagus to grow, promising strong plants and a bountiful harvest. Like with tomatoes, correct spacing is key to prosperous asparagus growth.
What is The Best Area to Plant Asparagus?
Full Sun: Just like blackberries, asparagus thrives in full sunlight. Select a location that receives at least 6 to 8 hours of direct sunlight each day for optimal growth and spear production.
Well-Drained Soil: Asparagus also requires well-drained soil to prevent waterlogged roots, which can be detrimental to the plants. Ensure the soil drains well to support healthy asparagus growth.
What Not to Plant Near Asparagus?
Invasive Plants: Avoid planting asparagus near invasive plants or aggressive weeds that may compete with asparagus for nutrients and space. Providing a weed-free environment around your asparagus is beneficial.
Plants Susceptible to the Same Diseases: Consider avoiding planting asparagus near other plants susceptible to the same diseases. Tomatoes, potatoes, peppers, and beans are some examples. Separating these plants can help prevent the spread of diseases.
Plants with Similar Growing Requirements: While asparagus needs its space, it’s also a good idea to avoid planting it too close to other large shrubs or trees that might shade it or compete for resources. Ensure that neighboring plants have similar light and water requirements.
Choose a suitable spot that gets plenty of sunlight and has good drainage for growing asparagus. Similar to blackberries, thoughtful layout and gaps are crucial for fruitful yield. Be aware of plants nearby, establishing this balanced setting helps asparagus thrive.
Chapter 3: Varieties & Season
Asparagus growing season
The time to grow asparagus usually falls in spring and the start of summer. Let’s quickly peek at the asparagus growing timeframe:
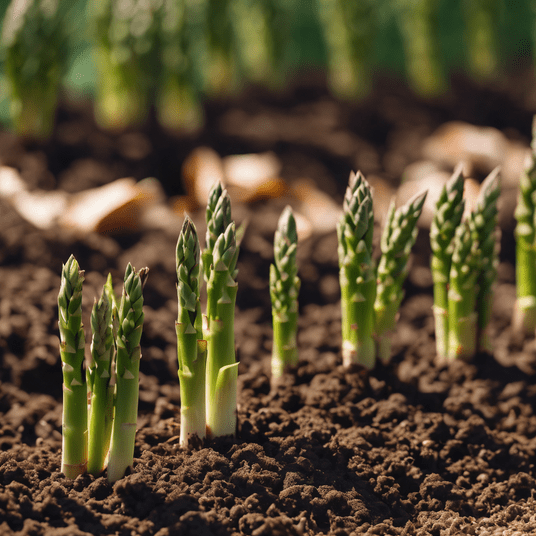
1. Spring Emergence:
- The time to start growing asparagus is in the early part of spring, often in March or April. Yet, it can change based on your local weather and grow zone.
- As the soil begins to warm up, asparagus crowns (the root systems of mature plants) send up their first shoots or spears.
2. Spear Harvest:
- In the beginning phase of the growth cycle, asparagus shoots poke up from the soil. We eat these shoots – they’re the tasty bit of the asparagus plant.
- Spears are typically harvested when they are about 6 to 8 inches (15 to 20 centimeters) tall and still tender.
- Usually, harvesting lasts for many weeks. This happens from late March till June or early July. It can vary based on where you live and the weather.
3. Foliage Growth:
- After the spear-harvesting period, asparagus plants continue to grow, producing fern-like foliage.
- The foliage is important for photosynthesis and helps store energy in the crowns for the next growing season.
4. Late Spring and Early Summer:
- As the asparagus plants continue to grow, they prepare for the following year’s harvest.
- The plant growing time can last into the end of spring and start of summer. Now the focus changes from making spears to producing leaves and storing energy.
5. Summer and Beyond:
- During the summer months, asparagus plants continue to develop their root systems and store nutrients in their crowns for the next growing season.
- Asparagus is a type of vegetable that keeps growing year after year. With the right care, these plants can keep making spears over a long time.
Remember, asparagus growing periods might not be the same everywhere. They get affected by where you live and the local weather. To get the most from your asparagus crop, it’s crucial to give the plants what they need. This includes soil that drains well, lots of sun, and good care through the growing time.
5 Best Asparagus Varieties To Grow in Your Garden
Asparagus comes in many varieties, each with special qualities.
Look at these five top asparagus types for garden growth.
This also includes info on weather likes and reasons for picking them:
1. Mary Washington
- Climate: Mary Washington asparagus is well-suited to a variety of climates, making it a versatile choice.
- Why Choose: This classic green asparagus variety is known for its excellent flavor and productivity. It’s a popular choice among gardeners for its reliability and tasty spears.
2. Jersey Giant
- Climate: Jersey Giant thrives in climates with cold winters and mild summers.
- Why Choose: Jersey Giant is prized for its large and tender spears. It’s an excellent choice if you want a high yield of delicious asparagus.
3. Purple Passion
- Climate: Purple Passion asparagus grows well in regions with cold winters and hot summers.
- Why Choose: This unique variety boasts purple spears that turn green when cooked. It offers a slightly sweeter flavor compared to green asparagus, making it a colorful addition to your garden and plate.
4. UC-157 F2
- Climate: UC-157 F2 asparagus is adaptable to various climates, making it a reliable choice.
- Why Choose: This green asparagus variety is known for its uniform spears, making harvesting a breeze. It’s also resistant to rust and produces consistently good yields.
5. Apollo
- Climate: Apollo asparagus grows well in climates with cold winters and mild summers.
- Why Choose: Apollo is valued for its resistance to rust and other diseases. It produces high yields of delicious green spears, making it a dependable choice for home gardeners.
Check out these five asparagus types. They match various climates and flavor likings. Think about your area’s climate and soil. Then, pick the ideal asparagus for your yard. Soon, you’re eating your homemade asparagus!
Does Asparagus Take 2 Years To Grow?
Yes, asparagus typically takes about 2 to 3 years to fully establish and produce a significant harvest. Here’s a general timeline of asparagus growth:
Year 1:
- In the first year after planting, asparagus plants focus on establishing their root systems and developing strong crowns (the underground parts of the plant).
- While you may see some spears emerge in the first year, it’s important not to harvest them extensively. Allow most of the spears to grow and mature into fern-like foliage. This helps the plants build up energy reserves for future growth.
Year 2:
- In the second year, you can begin to harvest some asparagus spears, but still, exercise caution not to overharvest.
- Asparagus plants will continue to produce spears throughout the growing season. You can gradually increase the harvest as the season progresses.
- By the end of the second year, your asparagus plants will be stronger and more capable of producing a more substantial harvest.
Year 3 and Beyond:
- By the third year, your asparagus plants should be well-established and capable of producing a full and regular harvest.
- Asparagus is a perennial vegetable, and properly cared for plants can continue to produce spears for many years, often 15 years or more.
Growing asparagus might take a few years before you can taste the fruits of your labor. But, remember, the outcome is a bountiful supply of tasty, homegrown asparagus for a long time. It’s crucial to look after your asparagus plants in their beginning years to guarantee a plenty and prolonged harvest.
Chapter 4: Soil Preparation for Asparagus
Why is it Important?
Soil preparation is a crucial aspect of growing healthy and productive asparagus plants. Properly prepared soil provides the ideal environment for asparagus to thrive. Here’s why soil preparation is essential for asparagus and how to do it effectively:
Importance of Soil Preparation for Asparagus:
Nutrient Availability: Well-prepared soil ensures that essential nutrients are readily available for asparagus plants, promoting healthy growth and spear production.
Root Development: Asparagus plants have deep and extensive root systems. Properly prepared soil with good structure allows for optimal root development, which is essential for nutrient and water uptake.
Drainage and Aeration: Adequate soil preparation improves drainage and aeration, reducing the risk of waterlogged roots and fungal diseases that can affect asparagus.
pH Balance: Asparagus prefers slightly acidic to neutral soil with a pH range of around 6.0 to 7.0. Proper soil preparation can help maintain the correct pH level for optimal nutrient absorption.
6 Essential Steps for Soil Preparation for Asparagus:
Step 1. Site Selection:
- Choose a sunny location for your asparagus bed, as asparagus thrives in full sun.
- Ensure the site has well-drained soil to prevent waterlogged roots.
Step 2. Soil Testing:
- Conduct a soil test to determine the pH and nutrient levels in the soil.
- Adjust the pH if necessary by adding lime to raise it or sulfur to lower it, aiming for the preferred pH range.
Step 3. Clearing the Site:
- Remove any weeds, debris, or grass from the area to reduce competition for nutrients and water.
Step 4. Adding Organic Matter:
- Incorporate organic matter such as compost or well-rotted manure into the soil. This enriches the soil with nutrients and improves its texture.
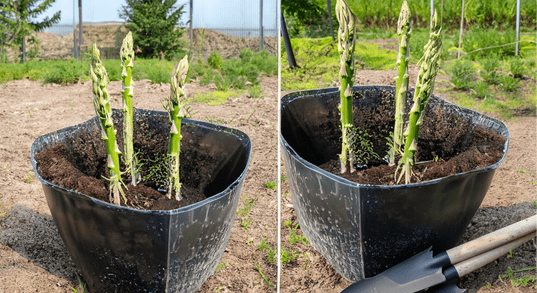
Step 5. Preparing Planting Trenches:
- Dig trenches that are approximately 12-18 inches deep and spaced about 18-24 inches apart.
- Mix organic matter into the soil at the bottom of the trenches.
Step 6. Planting Depth:
- When planting asparagus crowns, place them in the trenches with the buds facing upward, covering them with about 2 inches of soil.
- Gradually fill in the trenches as the asparagus plants grow, ensuring that the crowns are covered with soil by the end of the season.
By following these soil preparation steps, you can create an ideal environment for your asparagus plants to thrive. Properly prepared soil will support healthy growth, robust spears, and a bountiful asparagus harvest in the years to come.
Chapter 5: How to Plant Asparagus
How to Plant Asparagus 7 Easy Steps
Planting asparagus is a straightforward process that can yield delicious spears for years to come.
Here are seven easy steps to plant asparagus:
1. Choose the Right Location:
- Select a sunny location with well-drained soil for your asparagus bed. Full sun is crucial for asparagus growth.
2. Prepare the Soil:
- Conduct a soil test to determine the pH level and nutrient content of the soil. Asparagus prefers slightly acidic to neutral soil with a pH range of around 6.0 to 7.0.
- Amend the soil if necessary to achieve the desired pH level. You can add lime to raise the pH or sulfur to lower it.
3. Dig Trenches:
- Dig trenches that are approximately 12-18 inches deep and spaced about 18-24 inches apart. The width of the trench can vary, but it should be wide enough to accommodate the asparagus crowns comfortably.
4. Add Organic Matter:
- At the bottom of each trench, mix in organic matter such as compost or well-rotted manure. This enriches the soil and provides nutrients for the asparagus.
5. Plant the Crowns:
- Place asparagus crowns at the bottom of each trench with the buds (also called “eyes”) facing upward. Space them about 12-18 inches apart within the trench.
- Cover the crowns with about 2 inches of soil initially.
6. Gradually Fill Trenches:
- As the asparagus plants grow, gradually fill in the trenches with soil throughout the growing season. Be sure to keep the crowns covered.
7. Mulch and Water:
- Apply a layer of organic mulch around the newly planted asparagus to conserve moisture and suppress weeds.
- Water the asparagus thoroughly after planting and keep the soil consistently moist, especially during dry spells.
Note: Asparagus takes a long time to grow. Expect about one or two years before you can pick spears commonly. In the first couple of years, most spears should morph into fern-like leaves to fortify the plants. A mild harvest is possible in upcoming years.
These seven simple steps allow you to grow asparagus. You can look forward to tasty, fresh spears for many years. Good care and patience give you a healthy asparagus bed.
Chapter 6: How to Care for Asparagus
6 Easy Care for Asparagus
Caring for asparagus is relatively straightforward, and with proper attention, you can enjoy a bountiful harvest for years to come. Here are six easy care tips for asparagus:
1. Adequate Watering:
- Asparagus plants require consistent moisture, especially during their early establishment. Water deeply once or twice a week, keeping the soil consistently moist but not waterlogged.
- Pay attention to dry spells and hot weather, as asparagus may need more frequent watering during such periods.
2. Mulching:
- Apply a layer of organic mulch around the base of asparagus plants to help retain soil moisture, regulate temperature, and suppress weed growth.
- Mulching also helps in reducing competition for nutrients and water.
3. Fertilization:
- Apply a balanced fertilizer suitable for asparagus in early spring as new growth emerges. Follow the recommended application rates on the fertilizer label to avoid over-fertilization.
- Consider using organic options such as compost or well-rotted manure to enrich the soil and provide gradual nutrient release.
4. Pest and Disease Management:
- Regularly inspect your asparagus bed for signs of pests like asparagus beetles or diseases like rust.
- Implement integrated pest management (IPM) practices, which may include hand-picking pests, using organic treatments, or practicing good garden hygiene to reduce disease risk.
5. Fern Management:
- Allow asparagus ferns to grow during the growing season. These ferns are essential for providing nutrients to the roots.
- Prune and remove any dead or diseased ferns to maintain plant health. Cut them back in late winter or early spring before new growth begins.
6. Winter Protection:
- In regions with cold winters, consider mulching the asparagus bed with straw or leaves to protect the crowns from freezing temperatures.
- Remove the winter mulch in early spring as new growth emerges.
By following these simple maintenance tips, you can guarantee the wellbeing and productivity of your asparagus plants. Asparagus, a recurring vegetable, delivers tasty spears each year when given accurate care and focus.
Chapter 7: How to Prune Asparagus
What is The Best Time to Prune Asparagus?
The best time to prune asparagus is in late winter or early spring, typically before new growth begins. This practice helps remove dead or diseased foliage and prepares the plants for the upcoming growing season.
6 Easy Steps to Prune Asparagus
1. Gather Your Tools:
You’ll need a pair of clean and sharp pruning shears or scissors for the task.
2. Observe the Ferns:
Examine the asparagus ferns to identify any dead, yellowed, or diseased fronds. These are the ones you’ll want to prune.
3. Cut the Ferns:
Using your pruning shears or scissors, carefully cut the unwanted fronds at the base, close to the soil level. Ensure a clean and neat cut to minimize damage to the healthy plant.
4. Remove All Debris:
Collect and remove all the pruned foliage from the asparagus bed. Proper disposal of the cut fronds helps prevent the spread of diseases and pests.
5. Leave Healthy Ferns:
Be sure to leave the healthy, green ferns intact. These ferns will continue to photosynthesize and provide nutrients to the asparagus crowns, supporting future growth.
6. Additional Tips:
As the planting period moves forward, keep a close watch on the asparagus area for fresh signs of illnesses or bugs. Be quick to get rid of and toss any troubled fronds to stop more trouble.
RephraseOnce the last gathering finishes in either the end of spring or start of summer, let the remaining healthy ferns grow as they wish. These ferns will save up power for their next season of growth.
By following these easy steps and pruning your asparagus in late winter or early spring, you’ll help maintain plant health and encourage a robust harvest of delicious asparagus spears.
Chapter 8: Common Disease Asparagus
5 Common Asparagus Diseases (Identify & Treat)
Asparagus can have a handful of diseases that interfere with their growth and productivity. Here are five usual diseases, how you can recognize them, and cure choices.
1. Asparagus Rust (Puccinia asparagi):
- Identification: Look for small, yellow to orange spots on the ferns, which may develop raised pustules or spore-producing structures. Rust often causes defoliation.
- Treatment: Remove and destroy affected ferns promptly. Apply fungicides if necessary, following label instructions.
2. Fusarium Crown and Root Rot (Fusarium spp.):
- Identification: Affected plants may exhibit stunted growth, yellowing foliage, and wilted stems. The roots and crowns can show signs of rot and discoloration.
- Treatment: There is no effective treatment once the plant is infected. Avoid planting asparagus in soil known to be contaminated with Fusarium. Practice crop rotation and ensure well-drained soil.
3. Purple Spot (Stemphylium vesicarium):
- Identification: Purple or reddish-brown spots with white centers appear on the stems, causing the ferns to weaken.
- Treatment: Remove and destroy infected ferns. Apply fungicides if the disease persists.
4. Asparagus Beetle (Crioceris asparagi):
- Identification: Adult beetles are about 1/4 inch long, metallic blue-black with red or yellow markings. Larvae are greenish-gray and covered in black excrement.
- Treatment: Handpick adult beetles and larvae. Neem oil or insecticidal soap can be used for severe infestations. Maintain good garden hygiene to reduce overwintering sites.
5. Phytophthora Crown and Root Rot (Phytophthora spp.):
- Identification: Infected plants may exhibit crown and root rot, leading to wilting, yellowing, and death. Affected crowns may show dark lesions.
- Treatment: Prevention is key. Ensure well-drained soil, avoid overwatering, and practice crop rotation. Fungicide applications may help in severe cases.
Staying on top of checks, keeping things clean, and good garden habits are key to stopping and dealing with asparagus diseases. Spotting and treating diseases quick can help keep your asparagus plants from getting hurt too bad.
Chapter 9: Common Pest Asparagus
5 Common Asparagus Pests (Identify & Treat)
Asparagus can be susceptible to various pests that can damage the plants and reduce yields. Here are five common asparagus pests, how to identify them, and treatment options:
1. Asparagus Beetle (Crioceris asparagi)
- Identification: Adult beetles are approximately 1/4 inch long and come in two varieties: the common asparagus beetle, which is metallic blue-black with red or yellow markings, and the spotted asparagus beetle, which has orange-red elytra with black spots. Larvae are greenish-gray and covered in black excrement.
- Treatment: Handpick adult beetles and larvae from plants. Neem oil or insecticidal soap can be used for severe infestations. Maintaining good garden hygiene by removing plant debris can help reduce overwintering sites.
2. Asparagus Miner (Ophiomyia simplex)
- Identification: Larvae of the asparagus miner are small, legless maggots that tunnel into asparagus stems, creating winding tunnels filled with frass.
- Treatment: Prune and destroy infested spears. Insecticides may be used if the infestation is severe.
3. Cutworms (Various Species)
- Identification: Cutworms are nocturnal caterpillars that may cut young asparagus spears at or near the soil line, causing them to wilt and die.
- Treatment: Use physical barriers like collars around young spears to prevent cutworm access. Bt (Bacillus thuringiensis) can be used as a biological control for caterpillar pests.
4. Aphids (Various Species)
- Identification: Aphids are small, soft-bodied insects that may be green, yellow, brown, or black. They cluster on asparagus stems and foliage, feeding on plant sap and leaving behind sticky honeydew.
- Treatment: Wash aphids off plants with a strong stream of water. Insecticidal soap or neem oil can be used for severe infestations.
5. Slugs (Various Species)
- Identification: Slugs are soft-bodied, slow-moving mollusks that feed on asparagus foliage, leaving behind irregular holes and slime trails.
- Treatment: Handpick slugs in the evening or early morning when they are most active. Use slug baits or traps to control their population.
Always check your asparagus plants for pest problems. Act fast to stop harm. Use Integrated pest management (IPM), for good garden health. IPM uses physical barriers and careful use of insecticides. This way, you can control asparagus pests properly. Also, this reduces harm to the environment.
Chapter 10: How to Harvest & Store Asparagus
Harvesting and Storing Asparagus
Properly harvesting and storing asparagus is crucial to enjoy its freshness and flavor. This chapter provides guidance on how to determine when asparagus is ready to harvest, how to harvest it correctly, and effective storage techniques.
How to Know When Asparagus is Ready to Harvest
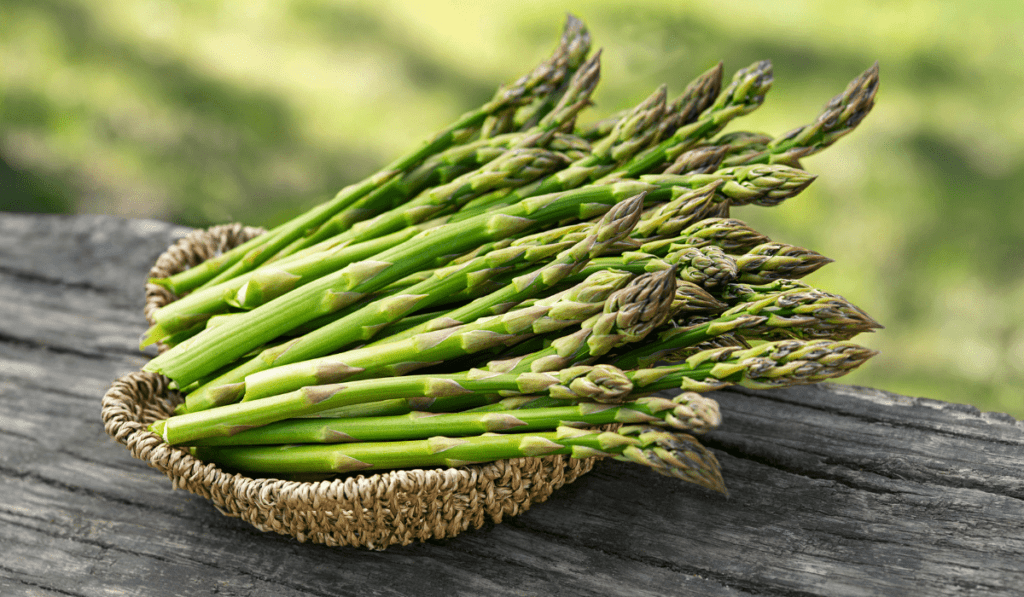
Spear Length: Asparagus spears are ready to harvest when they reach about 6-8 inches in length. Spears that are larger may be tougher and less tender.
Snap Test: Gently bend the spear near the base. It should snap easily. The lower, woody part of the spear is not suitable for eating and can be tough.
Uniform Size: Harvest spears of similar size to ensure even cooking.
Proper Harvesting Techniques
Use a Knife or Asparagus Cutter: Cut the spears just below the soil surface using a sharp knife or an asparagus cutter. Avoid snapping as it may damage the crown.
Harvest Regularly: Harvest asparagus spears every 2-3 days during the peak season, as they can grow quickly.
Storing Process for Asparagus
Refrigeration: Store fresh asparagus in the refrigerator. Wrap the cut ends in a damp paper towel and place them in a plastic bag. Keep them in the vegetable crisper drawer.
Standing in Water: Alternatively, you can place the cut ends in a container with about an inch of water and cover the tops with a plastic bag. Change the water every few days.
Consume Promptly: Asparagus is best when consumed within 2-3 days of harvesting, as it loses its sweetness and tenderness over time.
Blanch and Freeze: If you have more asparagus than you can consume quickly, blanch it in boiling water for a few minutes, then plunge it into ice water to stop the cooking process. Drain and freeze in airtight containers or freezer bags for long-term storage.
By using these collection and saving methods, you can enjoy the bold taste of asparagus and maximize your yield. Asparagus adds a nice touch to many recipes, and right care guarantees its goodness and taste for your cooking journey.
Conclusion
growing and caring for asparagus in your garden can be a rewarding experience. From planting the crowns or seeds to nurturing the ferns and harvesting those tender spears, each step is a journey towards enjoying the delicious flavors of homegrown asparagus.
Remember, asparagus may take some time to establish itself, but the patience and care you invest in its growth will pay off with years of abundant harvests. Whether you choose classic varieties like Mary Washington or opt for something unique like Purple Passion, there’s an asparagus variety to suit your taste and climate.
However, it’s not just about planting and harvesting. Proper maintenance, including soil preparation, pest and disease management, and pruning, is essential to ensure the health and productivity of your asparagus bed.
Once it’s time to harvest, knowing when to snap those spears and how to store them properly will help you savor the freshness and flavor of your homegrown asparagus for days to come.
So, unlock the secrets of successful asparagus gardening, and enjoy the satisfaction of growing your own delicious, homegrown vegetables. Happy gardening and happy eating!